It's happened to all of us right? You get your monthly cell phone bill, pop open the envelope or email and there it is.
A huge number jumps out and you nearly fall out of your seat.
How did this happen?! This can’t be right! Oh wait...there it is...another data overage.
While our smartphones are becoming more indispensable by the day, they’re also becoming more pricey.
One of the largest culprits? Mobile data plans.
Whether you’re checking your email, gaming with friends or catching highlights of the game on the commute home, every little thing you do is eating away at your data plan.
If you asked your carrier what to do, they’d probably tell you to upgrade your plan. No thanks!
With a little investigation, some digging into your phone settings and the use of a few free tools, you can drastically reduce your data usage without having to shell out more money to your service provider each month.
In this guide, we’re going to cover everything you need to know about wrangling your data demons.
It’s a lot of information. But don’t worry! We’ll break it into convenient sections so you can follow along with ease. From understanding just where your data is going to diving deep into the phone and app settings, when you’re done with this guide, you should have no more problems with surprise overages.
Top data saving tips, including...
Related Guide: How Much Smartphone Data Do I Need?
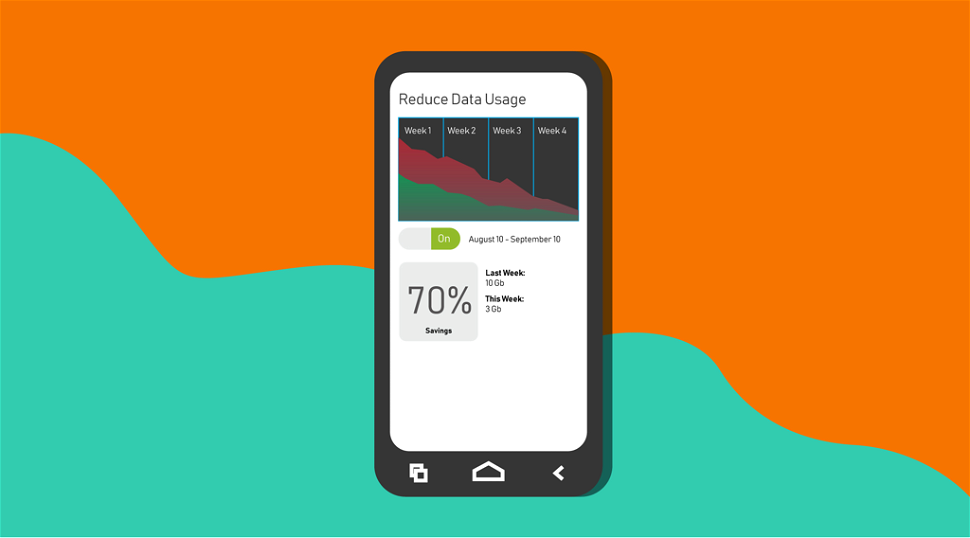
Here's How You Can Reduce Your Data Usage
#1. Use Data Monitoring to Find Your Data Hogs
Before you can start saving data, the first thing you’ll want to do is figure out the apps using it.
There are a three main ways to monitor your bandwidth usage:
- Check your monthly bill: While this method is sure to be accurate, it's less than useful for keeping tabs on your usage throughout the month.
- Check with your carrier: Most carriers offer dedicated apps you can download to your phone or provide usage meters on your online account. While these are often accurate and quicker than waiting for your statement, they tend to offer little in terms of features.
- Use a third-party app or phone feature: This option is what we recommend and will outline below. You get all the monitoring accuracy of a carrier app with the ability to set limits and actually avoid overages instead of simply know they’ve occurred.
Here's How To Monitor Your Data Usage on an Android Phone
Android phones make it simple to check your data usage.Step 1: Head to the Settings in your app drawer and tap Data Usage.
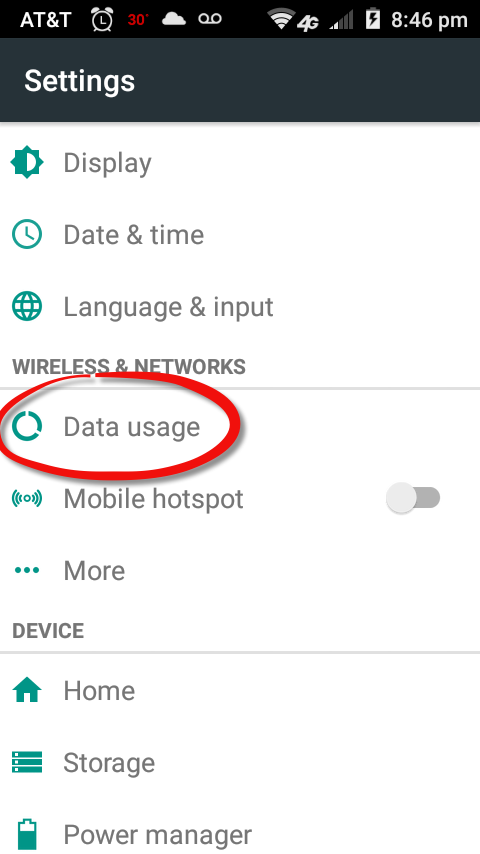
Step 2: You’ll get a handy little chart of the data you’ve used in the last month or so by default. Underneath the chart, you’ll find it broken down further by app in order of most data usage to least.
![]()
Note: Although the screen notes that carrier data accounting may differ from your device, we find this screen to be very accurate in tracking our usage.
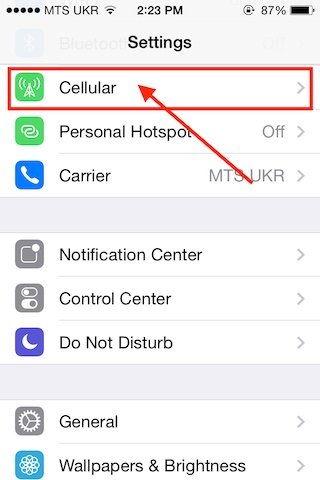
Here's How To Monitor Your Data Usage On An iPhone
In iOS, Apple shows your cellular data usage plus lists every app that has access to cellular data, along with a total of how much it’s used.Step 1: Head to Settings and tap the Cellular option.
Step 2: Scroll down to see your overall Cellular Data Usage since the last time you hit reset.
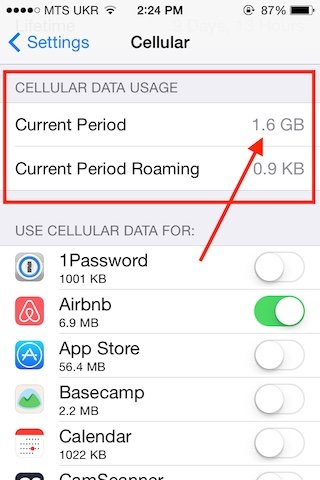
Step 3: Scroll even further down to see the amount of data an individual app has consumed.
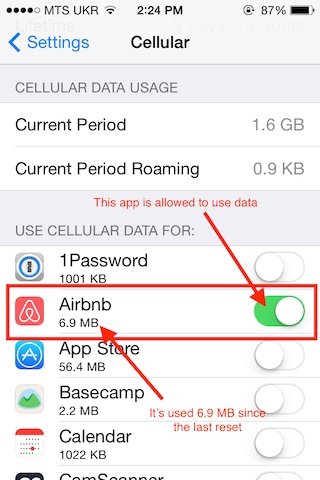
Note for iPhone Owners: Unlike Android, Apple doesn’t show a specific date range for your data usage. Instead, the amount shown is a tally of your usage since the last time you tapped the “Reset Statistics” option. This means that if you want to monitor your data usage month-to-month, you’ll need to remind yourself to reset the counter. Or, alternatively, you can look to a third-party app.
Track Your Data Usage With Third-Party Apps
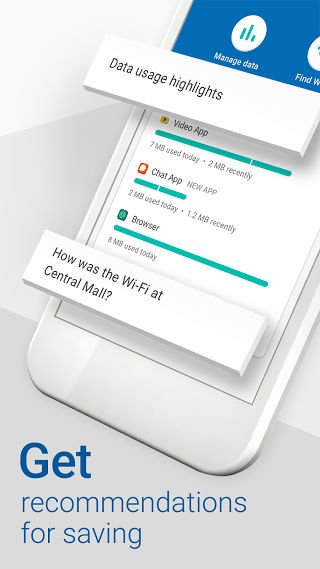
If want additional information about your data consumption, you can download one of the many available apps.For Android phone owners, Google recently released the Datally app. It offers a user-friendly design similar to the native Android data management features while tacking on advanced goodies. Other features include per-app data tracking, real-time data usage, data-saving mode, and a Wi-Fi finding tool.
Those of you with an Apple iPhone might consider Mobidia Technology’s My Data Manager or Johnny Ixe’s DataMan Next.
All of these apps offer granular breakdowns and let you really dig deep into where your data is going.
Be sure to make a list of some of your biggest data users. We’ll be working to trim these down later in the guide.
#2. Turn on Usage Alerts / Set Usage Limits
While knowing your data usage is nice, the real power of these tools is the ability to set warnings and even cut off your data usage when you reach your monthly allowance.
Of course, this doesn’t work well on shared data plans. But don’t worry, we have a few options for those types of plans as well.
The same apps mentioned above for monitoring usage will allow you to set limits. Just enter your billing cycle dates and the amount of data on your plan within the app settings. You can set warnings, create widgets and choose the action that happens when you reach your threshold.
We recommend a setting a warning around 75 to 85% of your plan and then cutting data off around 95%.
This will allow a bit of wiggle room should you absolutely need to download an email attachment, send a photo, or have another essential use for your data before the end of your billing cycle.
#3. Let Your Carrier Limit Your Data
Do you have a shared data plan and want a bit more control over how the kids use their phones? Most service providers offer features to restrict data usage, monitor apps and even use your computer to view the contacts stored on your phone or tablet.
You’ll need to spend time setting up each line to get the most out of the features, but you don’t have to worry about people not paying attention to how much data they’re using or disabling data restrictions you have set up using phone features or third-party apps.
You can also restrict data access to particular times of the day. This means you won’t be burning through data while you sleep and your friends are posting about their late-night eats on Instagram. You can also use this to keep kids from browsing Facebook at school or ensuring distraction-free hours for work.
Although most carriers charge a small monthly fee for these features, it’s typically much less than a single overage charge. Many are as little as $5 a month.
Major US carriers that offer this feature include Verizon and AT&T.
Currently, the only Canadian provider to offer this feature is Telus Mobility.
The UK has a few more options, with EE, Orange, T-Mobile UK and Vodafone all offering their own take on the concept.
Now that you have ways to track or limit your data usage, we’ll start optimizing your phone or tablet to use as little data as we can.
While we’re trying to save as much data as possible, we also understand that your phone is only useful if you can actually use it. So we’ll keep restrictions flexible.
Even if you don’t use all of the options provided below, you should still find that picking and choosing from the list provides savings.
#4. Use Wi-Fi Whenever Possible
One of the simplest ways to reduce data usage is to use Wi-Fi as much as possible.
You probably already use your home Wi-Fi connection and, if allowed, the Wi-Fi at your office. But you’re also probably overlooking a number of options around town that could be saving your precious data allowance.
In the last few years, Wi-Fi has popped up everywhere. From fast-food restaurants to public libraries, it’s not hard to find a solid Wi-Fi connection these days.

Take some time to scout around the areas you frequent. Pulling up the Wi-Fi settings of your phone will provide a quick list of networks within range of your location.
As long as the connection appears trustworthy and isn’t password protected, you should be good to go. Once you’ve connected, most phones will remember the network and connect automatically when it detects a signal.
With a little searching, you can create a virtual map of networks and your phone will just hop between them as you go about your day.
Related Guide: If you’d like more information about how you can take advantage of Wi-Fi, be sure to check out of Wi-Fi hotspot guide. It covers common places to look for hotspots, additional tools for finding connections and even tricks for keeping your private data safe while using public networks.
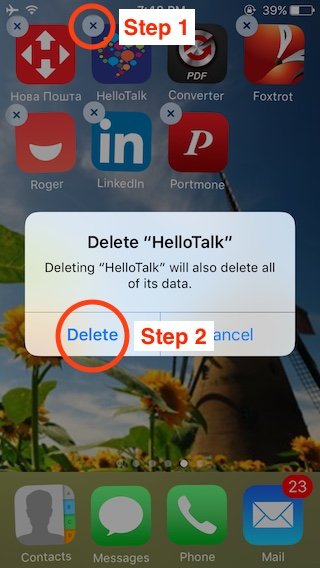
#5. Get Rid of Apps You Don’t Need
You might notice that some of the data usage listed in your data monitors come from apps you rarely open. Whether they’re reporting analytic data back to a business, receiving over the air updates, or pushing alerts that you dismiss and forget about, all of these actions are taking small nibbles off your data allowance.
Much like a buffet dinner, a few nibbles here and there won’t hurt anything. But nibbles add up. Next thing you know, your bill is bloated and your wallet has to loosen its belt.
As storage capacity on phones continues to increase, the chances of old apps just hanging around and leeching off your data go up as well.
Take a little time to uninstall the apps that you don’t use.
If they’re pre-installed by your carrier and you can't remove them, disabling them will at least stop them from using data. Just check in periodically to make sure they stay disabled. Sometimes an update will re-activate the app and leave it free to munch your data again.
For Android, you’ll need to head to Settings > Storage. Depending on your phone or tablet, this screen might take a few minutes to load.
Once it has loaded, tap the listing for Used Space and prepare to wait a few seconds longer.
When all the numbers finish loading, tapping Apps will bring up a list of all installed apps and services on your phone. Simply tap the app and choose Disable.
On iOS, you’ll can’t fully disable many of Apple’s primary apps, but you can restrict data access.
Under Settings > Cellular you’ll find a full list of apps installed on your device. Toggle the switch and it should change from green to white.
#6. Turn off Siri or Google Assistant
We won’t deny that Siri and Google Assistant are both cool and useful. But unfortunately, they can also be very heavy on data.
All of that magic going on behind the scenes to show you your flight plans, update the weather, and answer questions on the fly? Yeah... that’s using your data.
Even if you’re not using the feature, it is still busy analyzing everything about your phone, email, SMS messages, and other items on your phone in the event you do use it. Privacy concerns aside, this is simply not a good way to use your data.
To disable Google Assistant, you’ll need to launch Google Assistant by holding the home key on your Android device or launching the Google app in your app drawer. Then simply click the menu button and choose settings. At the top of the list, you’ll find a toggle to completely disable the feature. Confirm your selection and you’re done!
Disabling Siri is simple too. Tap Settings on your home screen. Under settings, you’ll want to find the General section. You should see a Siri button half-way down the page. On the main Siri page, simply toggle the feature at the top of the list and confirm your changes!
No more snooping. No more mystery data usage.
Now that you know you’re using your data efficiently, it’s time to start digging deeper into what is using your data.
We’ll start with some general settings and work our way down to common specific apps.
#7. Disable Background Data on Data Hungry Apps and Services
Both Android and iOS devices allow apps to run in the background to provide location-based notifications, quicker app switching, and other features.
While this might speed up performance by a few seconds here and there, the drawback is the constant trickle of data and battery life that your apps might be consuming.
Fortunately, both offer ways to control or completely disable this feature to take back your precious data stash.
On Apple devices, you’ll want to head to Settings > General > Background App Refresh.
You’ll see the main toggle to completely disable the feature at the top of the list. Below it, you’ll find a list of apps that are allowed to run in the background.
How much data you’ll save depends on the apps you disable, but keep in mind that disabling commonly used or core phone apps could result in losing a feature you enjoy.
On Android devices, you’ll want to head to Settings > Wireless & Networks > Data Usage. At the bottom of the page, you’ll find a list of the most data-hungry apps on your phone.
To eliminate background data usage entirely, tap the three dot menu button at the top of the screen and then choose Restrict Background Data. Confirm your selection and you’re good to go!
If you’re looking to disable them individually, simply tap the app and toggle the Restrict App Background Data switch at the bottom of the page.
One key difference here between Android and iOS is how they disable the data usage.
Android only disables mobile data usage. If you’re on Wi-Fi, your apps will still run as normal, sending and receiving information as needed on your unmetered connection.
Disabling background data on iOS is universal. This means you might want to consider taking the app-by-app approach on your iPhone or iPad to continue using some features while at home on your Wi-Fi connection.
Of course, you could simply enable the feature when you know you’ll be out of Wi-Fi range for an extended period and disable it when you return home as well.
#8. Disable Network Switching to Avoid Data Charge Surprises
There’s nothing more frustrating than trying to use an app with a weak signal. To try to keep your browsing snappy and apps running fast, both Android and iOS have added some features that test your Internet connection and switch to data if needed.
This wasn’t such a big deal before 4G. If you were on any Wi-Fi connection at all, it was probably faster than your mobile connection. Now, with mobile transfer speeds rivaling home Internet connections, these features are jumping out to surprise users at the end of the month. Sometimes to the tune of thousands of dollars.
To make matters worse, many phones enable the feature by default. So even if you’re on Wi-Fi all day, it can’t hurt to check your phone’s settings.
If you’re running an Apple device, disabling the feature is simple. Just tap Settings > Cellular and swipe down to the bottom of the page. Disable Wi-Fi Assist and you’re good to go.
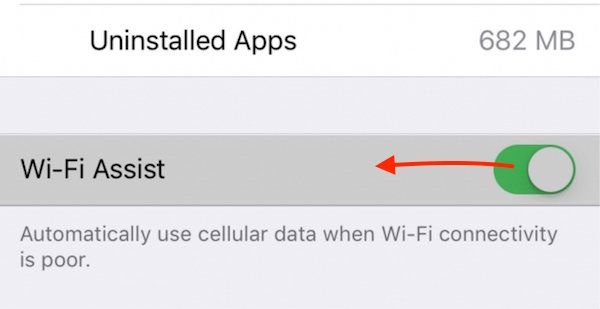
The feature was added in iOS 9, so if you’re running an older device or have avoided updates somehow, you don’t need to worry about it.
If you’re an Android user, things get a little trickier. This is mostly due to the customizations so many makers add to the stock Android interface.
Steps for your specific device might differ slightly. However, in most cases, you’ll start by heading to Settings > Wi-Fi.
Many major manufacturers include the setting at the top of this screen. Samsung’s popular Galaxy line refers to it as Smart Network Switching. Just tap the switch or checkbox and confirm your change.
If you don’t see it on this page, try tapping the menu button and checking under Advanced. You might also find it under another name. For example, my prepaid AT&T handset has an option called Avoid Poor Connections.
#9. Close Out Apps When You’re Not Using Them
On a similar topic, don’t forget to close out any apps when you’re done using your phone. While it might be handy to be able to pull up a quick list of recent apps, you’re placing undue stress on your battery life and possibly allowing your data to slowly trickle away.
In iOS, this is as simple as tapping the home button twice and swiping up on the apps that you’d like to close.
The process is similar on Android devices. Either tap or hold the menu button (this will depend on your device settings) on the face of your phone or tablet and swipe away the apps that you don’t want to close.
Many versions of Android also include a close all feature for quickly killing all of the tasks.
This brings us to another debatable point: third-party task managers.
In the early days of smartphones, these were a great way to conserve precious memory or performance. With the sheer power of most of today’s modern handsets and the optimizations built into newer versions of iOS and Android, they’re really not necessary.
Even worse, some of them might actually cost you more data by clearing caches every time you close an app or displaying apps. This means your phone will be forced to constantly download the same data back to your phone when you relaunch the app. Use these apps with caution.
#10. Disable Automatic App Updates
If you’ve never changed any settings on your phone, you probably noticed that Google Play or the iTunes App Store were near the top of your data usage. This is because many phones allow app updates and OS updates to download over your mobile data connection.
With many of the most popular games reaching one gigabyte (GB) in size and OS updates burning through multiple GB at a time, this can be disastrous to your data allowance.
Multiply this across multiple phones on a shared plan and you can almost guarantee you’ll be shocked when the bill rolls in.
If there’s one tip in this guide that is an effective way to drastically reduce your data usage, this is it.
Instead, only update your phone when on Wi-Fi.
On Android, you’ll want to fire up Google Play. Tap the hamburger menu button on the upper left and choose Settings. The first option on the list is Auto-Update Apps.
Tapping it will present you with two more options:
- Do not auto-update apps will give you full manual control of when and what you update. This is great for keeping that size of bloatware on your phone to a minimum.
- Auto-update apps over Wi-Fi only will check for updates throughout the day when you’re on Wi-Fi. While it can be a bit of a battery hog, as you’ll probably find your phone updates at least once a day, it is convenient.
Using an iPhone or iPad? You’ll find controls baked into the settings on your device as well.
You’ll want to open up Settings. From there, you’ll want to tap iTunes & App Store followed by Automatic Downloads. Apple breaks things down a little differently, but you can still achieve the same result.
You should find four toggles at the top of your screen. If you disable the top three, you’ll need to manually trigger downloading of any music, apps or books that you purchase on iTunes or through the App Store. This mostly depends on your personal preferences.
Updates are the big data culprit in most cases. Toggling this will eliminate automatic app updates completely.
If you’d like to still enjoy the convenience of automatic updates, but only use your Wi-Fi connection, go back one screen to the iTunes & App Store page and scroll down until you see Use Cellular Data. Toggle this setting off and you won’t have to worry about your phone blowing through your data every time that Candy Crush pushes an update.
#11. Install an Ad Blocker
If you browse the web much on your phone or use free apps, there’s a good chance you’re running into ads on a regular basis.
One fix to this is ad blocking apps. These apps are loved and hated by many. Users love them because they get rid of all the clutter and annoyance of advertisements and pop-ups.
If you’re running iOS, ad blockers are easy to find thanks to a recent change in rules from Apple concerning these types of apps. While many of these apps are still maturing, three currently stand out from the pack:
FutureMind’s AdBlock and 10x’s AdBlock Fast.
All of them are easy to set up, block ads in both Safari and other apps, and require minimal permissions.
Unfortunately, Android users will have a tougher time. Google does not allow content blocking apps on the Play Store. So you’ll have no choice but to install a third-party app if you want comprehensive ad blocking.
There are a number of browsers that feature ad blocking that we’ll cover later in the guide, however, you’ll still have to deal with ads in your games and apps if you choose that option.
The current leader in ad blocking apps is a veteran from computer-based ad blocking, AdBlock Plus. The site even features an installation guide to help you get up and running quickly.
There is one major drawback--unless your phone is rooted, ad blocking will only work over Wi-Fi connections. This doesn’t help save data but can still reduce annoying ads.
Note: What you might not realize is that while they're annoying, ads often help to pay for the costs of running and maintaining a website. In many cases, they might be the only form of income that a site sees at all. If you do decide to follow this tip, we’d very much appreciate if you made a point to go into the settings and add us, The Informr, and any of your other favorite sites to the whitelist. This will let the sites that you choose to support continue to display ads and continue to fund high-quality content like the guide you’re following right now.
#12. Limit Gaming to Wi-Fi Only for Easy Data Savings
Estimated usage: 4MB to 100MB to download, as much as 1MB per minute to play
When we mentioned ads above, one of the first things you probably thought of was in-game advertisements. Much like we mentioned above about ads supporting websites, they’re also one of the main ways that game makers earn money.
It seems that no matter what you’re playing on your phone or tablet these days, you can count on spending half your time playing and half your time watching ads. To make matters worse, many games use video ads instead of simple banners or text.
Many even tie in-game bonuses to watching advertisements, enticing you to part with your data one video at a time. These are served up at random from a list and quality is based on the speed of your connection.
This means that if you’re on a 4G network, the data for game advertisements can pile up at an astonishing rate. Especially if you’re constantly going for those “free” bonuses.
Also, since the ads are served up in an app, many ad blocking apps won’t work to remove them. If you play a game often, it might be worth the data savings just to drop the small fee that many apps offer to remove ads. You support the game maker and quit having to watch the same four videos over and over again. It’s a win-win.
None of this even includes all the data transmitted for multiplayer games or social elements. A recent article in PC World found that a popular multiplayer game exceeded 1MB per minute of play.
That will chew through even a large data plan surprisingly fast.
While not all games are data hogs, keep an eye on your data monitoring we set up earlier. If you notice a game rising to the top of your list, try to play it on Wi-Fi only.
#13. Disable Auto-Download on Your Communications Apps
Estimate usage: 1 text-only email 5KB, 1 email with photos 350KB to 5MB, 1 email with Office documents 300KB to 800KB
For many mobile phone users, texting, multimedia messaging, and messaging apps are how you communicate with the bulk of your contact list. If you’re using your phone for business, your email is probably constantly streaming notifications from your pocket as well.
While all of this is handy, it can take a toll on your data plan. Especially if your friends are the type to send gifs as responses, fire off video messages, or you’re proofing the latest presentation from work on your mobile.
To help reduce the strain on your data plan, be sure to check the settings for your communications apps for automatic downloads. While many will default to only downloading pictures over your data connection, it only takes one HD cat video or a large work attachment to put a serious dent in your data allotment for the month.
If you regularly send messages to multiple recipients, you’ll also find a setting in many messaging apps to send them as individual SMS messages instead of an MMS message.
While this might make communication between recipients a little difficult, it keeps the entire conversation on your unlimited text plan and off your data bill.
Popular apps that support these options include:
- iMessage
- Hangouts
- GMail
- Outlook
- Skype
- Kik
- LINE
- Snapchat
#14. Use Offline Mode for Streaming Media Services
Estimated usage: Streaming audio 500KB to 2MB per minute, streaming video 2MB to 10MB per minute
With the endless list of streaming services out there for music, movies, gaming, and anything else you might want to enjoy, media consumption is one of the leading uses of mobile phones and tablets.
This wasn’t a big consideration before high-speed mobile data was common. Your data simply wouldn’t keep up, so you had no choice but to use your Wi-Fi. These days, the average 4G LTE connection might just outrun the connection you use at home.
It’s easy to just tap your phone and get lost in your favorite television series or listen to the latest release from an artist you love. With 5G on the horizon, this will only get worse.
Unfortunately, this also means it’s easy to send your mobile bill sky high.
If you’re a frequent traveler or want to not worry so much about your data usage, many popular streaming services, such as Spotify, YouTube, and Amazon Video, offer affordable monthly premium plans that allow for offline viewing.
In many cases, the monthly fee is less than a single recharge of your data. Even if you need to pick up a microSD card to store all your digital goodies, you’ll still likely break even within a billing cycle or two.
Just set up your lists and set them to download using your home Wi-Fi while you sleep. When you wake up, you’re ready for your trip, commute or day with everything you want to watch. All without using a byte of your data package to do so.
If you must sneak in an episode or track on your data plan, adjust your quality settings to the lowest acceptable level. Especially when it comes to video, this can make a massive difference in the amount of data transferred.
Spotify defaults to lower quality audio on data connections. You can usually squeeze an hour or so into 100MB. However, go into the settings and enable lossless audio and you’re looking at a few GB for a single album.
An hour-long TV episode will only run you about 1GB in standard definition. Crank up the quality settings to UltraHD and you’re looking at a shocking 7GB.
Even if you have an unlimited plan, you’ll probably find yourself throttled rather fast at that rate. On a metered plan, a couple episodes could run you more on data charges than buying the entire season outright and downloading them when you get home.
#15. Quit Checking Your Updates and Notifications Every Five Minutes
Estimated usage: 1 standard web page with no video 150KB to 3MB
While having the ability to check your email, social media or favorite blogs in your pocket is a handy feature, moderation is the key. Data usage aside, checking your phone every few seconds isn’t good for productivity or, you know, interacting with real people either.
Every time that you refresh your Facebook feed, swipe through a few Pinterest boards, or check in for your latest People Holding Chickens fix, you’re using data. Even if there’s nothing new to see--and often there isn’t--you’re still using data to check for the potential update.
On Wi-Fi, this isn’t such a big deal. On your data plan, you’re slowly chipping away at your data allowance. Save it for important things and spare your bill.
If you have trouble with compulsively checking your phone, you’re not alone.
Fortunately, little things, like setting your phone out of reach or, better still, in another room while you work or spend quality time with family and friends, can make a huge impact on your frequent updates and data usage.
#16. Wrangle the Cloud
It seems everyone is offering some form of cloud storage these days. While it is a handy feature to use, your phone could be blowing through your data without you even realizing it. Both iOS and Android phones offer a number of apps and services that backup images, videos, and other files from your handset to cloud storage.
When phones featured crappy 3 megapixel cameras, this wasn’t a big deal. But with the ability to record 4K video or take professional quality photos on your phone comes to the possibility of using some serious bandwidth.
If you use popular apps such as iCloud, Google Photos, Dropbox ,or OneDrive, be sure to head to the settings page and set backups to Wi-Fi only. This lets you still enjoy the peace of mind of automatic backups while not having to worry about data charges.
#17. Turn Off Push Notifications
 One of the more sneaky data hogs on your phone or tablet is push notifications. Even when connected to Wi-Fi, push notifications might still be using mobile data depending on the app.
Although these transmissions are often small, if you’re receiving pushes from something like chat app or social app, they can add up quickly.
Both iOS and Android offer ways to limit the number of notifications that you receive.
On Android, the easiest way is to go into the Settings app and tap Apps in the Device section. From here, just tap the app that is sending notifications and toggle the Show Notifications checkbox. Confirm your changes and you’re good to go.
On iOS, you’ll want to head to the Notification Center in the Settings app. Tap the app that you wish to disable and toggle the Show in Notification Center slider. You can also disable the Badge App Icon and Sounds options if you’d prefer to completely mute the app.
This can be a tedious process but the savings are noticeable. If you’d prefer to leave notifications on, you could disable your data connection when you’re away from Wi-Fi. However, this will keep you from browsing the web or performing other tasks as well.
#18. Disable Widgets
After you’ve contained the torrent of updates, the next step is to get in and clean up your widgets. Common culprits of data creep include weather, RSS, email, and social media widgets.
Yes--these are great for getting information at a glance. But short of remote controls or flashlights, most widgets that sync data still require you to launch the app to actually do anything. So, if you’re going to spend the data, spend it using the app instead.
The exact steps for removing widgets will depend on your OS and, if you’re on Android, your launcher. But in most cases, simply press and hold the widget to see your options. If there isn’t a menu option to remove written on the list, look for the little trashcan or x icon and drag that data-hungry monster on over.
#19. Disable Auto-Play Videos for Social Media Apps
Sometime in 2014, Facebook decided it would be awesome to add an auto-play feature to videos in your timeline. Instagram and Twitter followed suit eventually.
While this might not be a big deal at home, the last thing you want to do is blow through a chunk of your data allowance as you scroll the stream of cat videos or lizard man conspiracy videos from your friends.
Facebook Auto-Play Videos can potentially increase the cost of a plan $240 over the course of two years. That’s enough to buy a new iPhone or high-end Android smartphone ~ GottaBeMobile
Fortunately, most iOS and Android apps make it easy to reverse this added feature. These steps should help to find the settings you'll need to turn off these data hogs for good.
Facebook
On Android, you’ll want to fire up the Facebook app. Tap the hamburger menu button in the corner and choosing App Settings. Scroll down and check the box next to Auto-play videos on Wi-Fi only and you’re good to go.
If you’re using an Apple device, you’ll want to head to your phone’s Settings app instead. Scroll down until you see the Facebook button. Tap it and choose Settings.
Scroll down to the Photo and Video section and toggle the Auto-play videos on Wi-Fi only option.
Twitter
On Android, you'll want to fire up the Twitter app. Tap the profile picture. Find Settings in the sidebar. Choose Data and tap on Video autoplay. Select the Never play videos automatically option.
Running an Apple device? No problem. Launch the Twitter app. Tap the gear icon followed by Settings. Choose Data from the list. Under Video Autoplay, select the Never play videos automatically option.
Instagram
Unfortunately, there's no way to completely disable autoplay in Instagram. However, you can stop it from loading videos in advance. However, if you're habitually scrolling through your Instagram stream, it will load videos as they scroll by. So take care when using Instagram even after adjusting the following settings.
On Android, you'll start by launching the Instagram app. Then tap the more options button on the upper-right corner. Choose Cellular Data Use and toggle Use Less Data.
Apple's steps are similar. Launch the Instagram app and then head to the settings by tapping the cog icon. Then go to Cellular Data Use and toggle Use Less Data.
#20. Stick to the Computer or Wi-Fi to Share Pictures and Video
Estimated usage: 1 image uploaded to social media or emailed 350KB to 5MB, 1 video uploaded to social media or emailed 5MB to multiple GB.
If you’re like many users, you spend more time in a messaging app, such as Snapchat or Whatsapp, than you do in your actual phone messaging app. These apps not only offer more features than traditional SMS/MMS messaging, but they don’t count toward your SMS/MMS allowance on your phone plan. Better still, you can talk with friends online without having to hand out your personal information.
On many major carriers, when you send a photo or video through your stock messaging app, it counts toward your messaging allowance for the month but does not count toward data usage. This was a compromise from when the feature was new but the potential to use data was low.
Much like with the cloud backup section, times and technology have changed. Most phones will compress high-resolution photos or video before sending when you choose MMS.
But what happens when you’re using a third-party app? Yep, it sends the full file.
Worse still, it uses whatever data connection is available. This means those selfies or pics of the kids could be eating away at your data plan message by message.
Unfortunately, settings for this are hit or miss.
Some apps will allow you to only send video over Wi-Fi, but most offer no options when it comes to video. Disabling data will disable the ability to message at all if you’re not on Wi-Fi. So that means you’re on your own to remember to follow this tip.
#21. Switch Up Browsers for Added Savings
Outside of apps and games, the next biggest chunk of data you use is likely related to web browsing. If you’re like many users, you probably just roll with whatever browser was installed on the phone when you pulled it out of the box.
I mean a mobile web browser is only so fancy, right?
WRONG.
These days mobile browsers are some of the most innovative browsers available. Better still, most of the innovations work toward saving your data or making it easier to find what you’re looking for without having to tap, type, and swipe all day long.
Let's do a quick rundown of some the options, including features they include to save data.

Chrome (Android | iOS): Google’s browser makes it simply to save data while using your phone to browse the web. Just launch the app, click the menu button in the upper right corner and go into settings. You’ll find a data saver option near the top of the list. Enabling this compressed websites as you browse to improve loading times and reduce data consumption. The latest update even intelligently filters non-essential images to save you up to 70% on your data usage.
Dolphin (Android | iOS): With its gesture and voice controls, integration with social media and support for a variety of third-party add-ons, Dolphin is an excellent full-featured alternative to the big name web browsers. One of the best data saving features of this browser is its integrated ad blocking.
Opera Mini (Android | iOS): Designed to be a lightweight alternative to other mobile browsers, Opera Mini is one of the most universally supported browsers out there. Unlike many other mobile browsers, the entire interface is designed for efficient use on a touchscreen. The Opera Turbo feature uses compression much like Chrome to trim data usage as you browse. If you’re using an Android device, Opera Max will optimize data usage in your apps as well.
Adblock Browser (Android | iOS): From the makers of one of the most popular ad-blocking add-ons on PC’s, Adblock Plus, Adblock Browser is a great option if you’re looking to decrease data usage or improve privacy while browsing the web on your phone or tablet. Setting up the browser is as simple as launching, tapping the menu and heading to Settings. Both Android and iOS offer options under Privacy & Security for configuring block lists, whitelisting sites, disabling website tracking cookies, phishing filters and more.
Looking to take your data saving to the extreme? Try out a text-only browser. While it might sound a little weird to browse the internet without images, it works quite well. Particularly for blogs, news streams, and other text-heavy content.
On iOS, MochaSoft’s Text Browser is an excellent option. Android users should check out SpaceNext’s TextOnly Reader Pro.
#22. Preload Pages on Wi-Fi for Added Savings
If you know you’re going to use a certain site while you’re on your commute or heading out to dinner, loading it up in your browser while you’re still on Wi-Fi will take care of most of the data usage when you need to access it later.
This can be a little tricky. In most cases, this won’t work for streaming video sites or other high-bandwidth content. This is mainly due to memory restrictions and the fact that most sites segment large downloads for better performance.
Remember when we mentioned the problem with task killers? This is one of them. If your task killer also kills cache, anything you load before you tap the button to kill running tasks will be deleted, leaving you to download everything over data.
Lastly, if your device is older or doesn’t have much RAM to work with, you might find this to be less effective.
#23. Enjoy Easier Navigation and Trim Data Consumption by Using Mobile Sites
While this is becoming less of an issue as websites clue in that more viewers are using their mobile devices, a mobile-specific version of a site offers multiple benefits.
In most cases, images and other data-hungry content will be scaled to fit your display. This results in instant data savings without the need for apps or compression. They may also reduce the number of ads, change ad formats, or implement smart loading to only load parts of the page that you actually view.
Another perk is that mobile sites are designed to be used on a touch interface instead of a mouse and keyboard. No more pinch zooming or trying to tap tiny buttons.

There is no guaranteed way of accessing a mobile-specific site. However, if one of your favorites does not automatically detect that you're using a phone to browse, replacing the “www.” portion of a web address with “m.” will often do the trick.
#24. Find Apps to Replace Common Website Features
Search engines put a world of information at your fingertips. Many even offer basic features, such as calculations, unit conversions, and other handy tools that you might be tempted to use. However, in these cases, grabbing an app to perform the task is often more data efficient.
For example, when you ask Google how many ounces are in a liter, you’ll get an answer. You’ll also get 10 websites, possibly an ad, and who knows what else when the page loads. Since most app data is pre-cached on your device, you’ll use little to no data if you use an app instead.
If an app is just a pretty interface for a website, you probably won’t notice much savings. Test a few of your commonly visited sites or online tools versus apps and compare.
Every little bit adds up.
#25. Don't Watch Videos Online!!
I know we covered this briefly above.
But seriously, if you value your data, stop streaming video over data.
Avoid YouTube, Periscope, Netflix, Hulu, and all those other data hogs while on your data plan.

If you’re looking for a way to enjoy your favorite videos on the go, use a service to download or convert videos store them on your device for offline viewing.
Keep in mind that downloading streaming videos might present legal issues depending on the licensing of the video and the site that you’re using. For that reason, we won’t dive too deep into the process.
A quick search for “streaming video downloader” in Google offers enough information to get you started if you’re interested in the topic.
You might also be thinking, “Isn’t there an app that can do this?”
The short answer is yes.
But due to the previously mentioned legalities, many app stores don’t allow video downloading apps to stay around for very long. Because of this, options change often, but a quick search for “video downloader” in iTunes or Google Play will usually yield results.
If you’re patient and don’t mind a few bugs here and there, it’s a sure way to save some data. But for many, signing up for a premium service that allows offline viewing--such as YouTube Red--is probably the easier option.
#26. Beware of Roaming--Even When You’re Careful with Your Data Usage
Roaming fee horror stories aren’t hard to find.
One day, you’re enjoying a family holiday or talking to friends while travelling on business. The next, you’re opening your bill to find a sum larger than the cost of the vacation.

If you’re planning to travel, be sure to check the network coverage for your carrier. If there’s the slightest chance of roaming, considering an international SIM or pre-paid option is always a safe bet.
We covered roaming thoroughly in our recent guide to saving on your monthly cellphone bill. Check it out if you’d like more information.
#27. Choose the Right Plan for Your Needs
After analyzing your usage and trying our tips, you should find that your data usage is drastically reduced. No more overages. No more bill shock.
Once you know how much data you’re using, be sure to check with your carrier to see if you can save by reducing your data allowance. If you’re not on a bundle plan, now might be the time to upgrade as well for additional savings.
Don’t forget to check with other providers as well. If you’re not on contract, you might find that you can take your existing device to another provider for added savings.
We have a free tool to help you compare plans here at The Informr (or use your favorite comparison site) to see how much you might be overspending.
That’s It!
We hope you see substantial savings on your monthly bill with the help of this guide. We believe this is one of the most comprehensive guides on the Internet.
To help maximize the usefulness of the guide, we’ve created a handy PDF version you can download and read later. Plus, as a bonus, we’ve dug deep and researched three more ways to save your precious data and added them to the guide as well.
All you need to do to access the PDF version is let us know where to send it in the box below.
Don't worry, we hate spam as much as you do. We promise to treat your email address like one of our own.
Your Turn
Did any of these tips help you? Have a tip of your own to share with others? We’d love to hear from you in the comments below.